Wednesday 22 January 2020

Sticky moments with papier mache....

I thought I'd have a go at papier macheing two items. One of the items is a polystyrene head, the other is my Gran's jug, I just love the shape of the jug and thought both items would look good decoupaged. I didn't want to lose the originals so papier mache copies could take the place of the real thing.


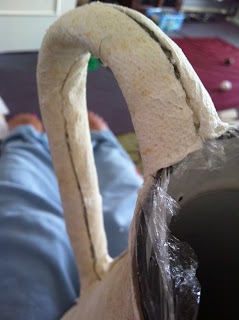
I covered both items with cling film, to make removal easier and to preserve the original items. After that it was just a matter of papier macheing and drying time.


I removed the dried papier mache by cutting with a sharp blade in as few places as possible. The jug was the trickiest, I cut inside the handle and continued the cut up to the neck of the jug. The next cut was on the out side of the handle and then down to the bottom edge.  


Cuts were also made on either side of the jug, leaving the lip intact. I then eased the pieces away from the jug with a pallet knife.


As you can see the pieces are a good match for the original. I put the papier mache pieces back together using masking tape, before applying another few layers of papier mache on both the inside and the outside. 


The head was cut from neck to neck, going over the top of the crown. I also cut under the chin which made it easier to ease the face away from the eyes and nose.


Here are the two pieces, all ready to decorate, paint or decoupage.


Wednesday 24 January 2018

I've got it covered...

Helloooo everyone, I've been up and down just lately and I'm fighting with bronchitis atm... but I'm on the mend and I've started to do a few bits & pieces.
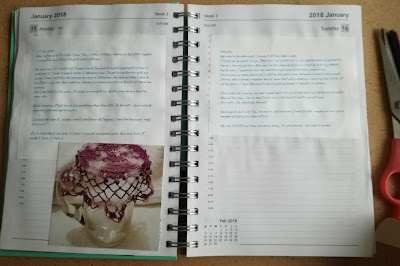
 So, I got myself a diary, aiming to do the obligatory daily entry because I have a feeling this is going to be a difficult year and what do you know? I've kept up so far.
Sticking the first bits of wallpaper...
I thought I'd decorate the cover ...so I grabbed a few bits an bobs, some old scraps of wallpaper, ribbon, lace etc, and before I knew it I'd finished...
The first few weeks were done on my lappie...
I was waiting for the ink to arrive for my new fountain pen :)

Not my usual colour scheme,
I had to go with what I had to hand...
but I'm really loving it!
My diary is starting to look more like a journal but thats fine by me... I'm printing small pics, as and when something happens and popping them on the relevant page and I'm hoping to do the odd sketch as well...
    
     Please leave a comment and let me know what you think of it...

Monday 15 May 2017

Watercolour complete!

TaaDaah! It's finished!
My 'Song of the Sea' is complete and, although it's very different to my imagined piece, I'm very happy with it.

I've also used the photo editing app on my tablet to explore different colour ways... quite a good way to look at possible future variations... I really like the deeper colours!

That's all for now folks, I'm thinking if mounting the original piece, just to see how it works in a frame... more on that later.

'The Song of the Sea'

A variation on colour.

Take care, be good to yourselves and each other x

Sunday 23 April 2017

I need to do something!!!

So peoples, it's been a while since my last post. As usual the dreaded Fibro & mecfs have interrupted life on a daily basis... some interruptions have been worse than normal & I've struggled to make any real headway with my crafting.
It really is very frustrating!

My photography has certainly helped, it always does... getting out & about is often a problem but over the years I've found that you can take photos anywhere, finding an interesting shot takes on a mission like quality and I've often found beauty in the 'mundane'. 

I've finally taken a satisfactory 'moon' shot, something that had evaded me until now. Here's my best one...

As I seem to be running on empty all the time, I needed something to do, something that wouldn't tax me and that I could pick up & put down. I need new glasses so beading and intricate work were out of the window, so I decided to pick up watercolour work again.

As I haven't done any watercolours for over 20 years, I picked two subjects to work on that I could do concurrently and experiment with. The sea and a piece that would include a hare were/are my chosen subjects... this post will follow those experiments and my improvement (I hope LOL)

I had a muck around before I really started experimenting with anything... 

I roughly sketched a sea shell before dabbling with my pallette. Not to shabby but I certainly need to practice, a lot!

So, firstly I scanned the internet for hare images, photos as well as other people's work, to give me ideas and also for shots of hares in all positions. These have been pasted in my sketch book, as reference material, that I can refer to whenever I want.

For anyone not familiar with watercolour work, you need to stretch your paper in order to stop it buckling when wet.

I've used a piece of plywood wood.
I placed my watercolour paper in a basin of tepid water, placed it flat on my wood and secured the paper with gummed brown paper called Butterfly tape. It was left, flat to dry out naturally. 

I also stretched a piece of music score for my other watercolour piece, I thought I'd try out an idea I'd wanted to do for quite a few years. Waves watercoloured on to a music score called 'The song of the Sea'

This is my page of hare sketches, I've used the top middle one for my watercolour. I've traced my sketch onto my stretched watercolour paper... it will be of a hare singing to the moon.

So peoples, here are the first few photos of The Song of the Sea in progress... please remember this is my first for 2 decades! ...there'll be more to follow very soon, so watch out for my next post! 
Please leave a comment and if you'd like to see more of my photography why not pop over to my photography/Fibro blog... seeitloveitsnapit.wordpress.com


Monday 5 December 2016

A Christmas card to make and give...

Hellooooo peoples, long time no blog!
I hope your autumn has been better than mine ... Fibro, cold weather and Chronic Fatigue have so much to answer for!

Right, straight down to business peeps ...before I go horizontal again :)

I thought I'd do a tutorial for a Christmas card, something simple enough to do with the nippers but stylish enough to be glitzed and glammed up for the adults.

You can buy packs of plain cards to use for decorating, they come with envelopes, in many craft outlets ...which means you can get straight down to the important stuff ~ your design and decoration.

However, it is very easy to make your own cards; packs of plain, A4,coloured card are widely available, as are packs of envelopes. 

The advantage of making your own card is that the you are not restricted by any one size.
A range of A4 card, cards and envelopes.
Firstly, I'm going to do a basic design, using both a ready made card as well as a homemade one, I'll also show you how the design looks when it is made by both an adult & a child.

Tap on the template image below, save it to your device, then print it out to use.
I've kept things simple, as promised, but you could use your own and draw any shape you like. 

Stencil/template.

If you're going to use a piece of A4 card, to make your Christmas card, score the card in half and fold, place to one side before you cut the stencil.

Making the template.
Cut a piece of card, from your scrap/ old box, cut it the same size as your Christmas card front (you can place your Christmas card on top of  the scrap card and draw round it), trace the stencil design on to the scrap card and cut out the shapes you want to decorate.

Place the template on your folded card, colour in the bauble shapes or glue diamantés inside the space.
Once your paint has dried you can glitter and decorate the baubles.


Draw a string, from the top of the bauble to the top of the card, finish it of with a drawn bow. You can also use thin cord, just stick it in place carefully.

This is my finished Adult version. I didn't draw the bauble shapes on, I just stuck the diamante's straight on to the card ...leaving spaces so that you're just indicating the shape. I also used a thin cord and a bow, as mentioned below, instead of drawing it on.

This next one was made by 7 year old Connie, without any help from me.


If you need to make small bows you can use a fork to help you. Fold your cord or ribbon around the fork tines, cross over at the front and thread one end through the centre gap, under and behind the ribbon and back over the top, out through the centre gap. Fasten of, trim the ends and slide the ribbon off the fork.

I hope you use the stencil to make your own cards, let me know if anything is unclear! ...& I'd love to see your finished cards ...Enjoy x




Thursday 1 December 2016

Boxing clever... Covering a box, one step at a time!

Hello all, I've recently had to start making a decorated present box, so I thought a step by step tutorial might be helpful ...I'll try and do a part 2, covering the actual decoration, just as soon as I finish the said box🌸
So, here's the original box. It's a nice sturdy one but the colour is not what I want.

Select your paper; I've used a white wall paper with a raised pattern; lay the lid on the wrong side of the paper and draw right around the shape. Measure the depth of the lid and add this measurement to each of the 4 sides, creating a border around your original shape.

Cut around the outer border line. Draw a line from each corner of your inner shape, out the the edge. Do this 8 times creating a mini box shape at each corner.

Now cut a V shape into the inner corner and trim the excess, don't worry about being too precise, these tabs will eventually be covered up.
You can also just cut out the entire corner square, I eventually decided to do this option because I intend to stick a ribbon around the edge of the lid to finish it off.

Glue the top of the lid. Use double sided tape if you wish. Because I may decide to paint effect the box, I decided to glue the paper to prevent any buckling if the paper gets wet.

Place the lid down onto the paper, smoothing and pressing it firmly in place, inside your inner line. Smooth any wrinkles out before gluing the edges (& the corner tabs if you're leaving them on)

If you're doing the tab option glue the tabs over each corner first. Wrap the wider edge of the tab around each side.

Stick the edges in place (overlapping the tabs if you've used them). Make sure you butt the edges together as neatly as possible, whichever option you use.

Now for the bottom part of the box. I'm working this out as I go along, so please bear with me!
...my box has a VERY very tight fitting lid and I know the lid will not fit on if I cover the bottom in the same way as I would a different box (ie covering the bottom of the box completely). 
I've decided to take the paper up to the point where the lid fits on to the box.
In this pic you can see the lid is on and I'm working out the measurement from the lid, down to the bottom of the box and enough to wrap underneath on to the base; at least 1.5cm. Add these measurements together for your paper width.

The next measurement you'll need is the distance around the whole box. Now cut your paper, it will be long and narrow (you can cut it in two pieces if necessary and butt them together when you stick them on to the box base).


I've kept the lid on as a guide for the paper. Paste the paper and start sticking it, pay special attention to the corners and look out for air bubbles. Smooth the paper on keeping it close to the lid edge.


Once you've stuck and joined the paper, cut down in a straight line at each corner.
Now fold in the ends and stick in place.


Do the same with the edges, until all edges are stuck down.


Trim and neaten any bits that aren't quite square.


Measure and cut a piece of paper to cover the base. The size should be large enough to cover the gap but it will look best if it is just slightly smaller than the base measurement. Stick it on and you're done!


Now I just have to figure out the decoration so watch out for part 2!
Happy box covering peoples (any questions?  ...just ask)🌸