Tuesday 24 November 2015

4 easy Christmas tree felt decorations to make with your nippers.


It's that time of year again and as usual my mind has turned to making Christmas decorations with the nippers. We had a lovely time making these so I'm sure you will as well.
I've drawn up 3 easy decorations. Candy cane mice, a tree and a heart. The patterns are printable on A4 with photos and instructions below. To make this set you will need...
  1. 2 colours of felt for each decoration.
  2. scissors
  3. glue
  4. candy canes
  5. Ribbon or Christmas string for hanging loops.
  6. decorations ~ gems, glitter, sequins or anything similar.
  7. Moving eyes or beads or buttons.

Candy cane mice.
I've taken Martha Stewart's idea and adapted it slightly, made my own template and tried it out with my little testers.
Here is the original link.  http://www.marthastewart.com/273608/candy-cane-mice


Print out the pattern, cut out one of the patterns (1 body, 1 main ears, 2 inner ears and 1 nose).
Cut out the pieces in the felt of your choice, I used white for the body and main ears & red for the other pieces. Now you're ready for the nippers to have a go.

Get them to roll up one side of the main ear & poke it through one slit in the body & out of the other. 


Now get them to glue the inner ear pieces on to the main ears & stick the nose on the end of the body.


Let the pieces all dry before pushing the candy cane through the back of the body, through the sleeve made by the ears going through the slits.


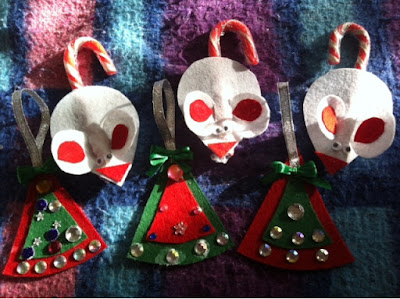
...& here they are in a different colour.


Christmas puddings, hearts and trees.


The tree and heart.
As with the first pattern, print the image on A4, cut out the paper pieces and then cut out in felt.
The tree and heart are very simple to make, with only 2 pieces to each pattern.
Layer the small piece on top of the larger and stick.


Stick a ribbon loop at the top of each piece, my loops were about 5" in length before folding in half. 
I've added an extra layer to my heart, you could do the same with the tree... in fact you could add as many layers as you like to either pattern, just make each one a bit smaller... try winding ribbon or Christmas string around the top piece before sticking.
Now decorate.


The Christmas pudding is made in exactly the same way as the heart and tree, it just has more pieces.
Attach a ribbon loop to the main pudding piece, now stick the topping piece in place. Stick the holly leaves in place before sticking the berries in place.
I'm waiting for some brown felt to arrive so I have no images of this yet... I'll be sure to add them this week so don't forget to check back :)


...here is the Christmas pudding .


I hope you've enjoyed these patterns... please leave some feedback in the comments x


Saturday 3 October 2015

An early morning start...

God morning readers, I'm awake, it's 3:30am... so I thought a quick blog was in order!

Today I took my mum to see her 7th great grand child, to say hello & to have a cuddle. All went extremely well and my knitted gifts were well received. I'd knitted the new baby a few items over the preceeding months, so here are some pics...

Firstly the bunny hat; I shall have to make the next size up for Christmas but adding the bow between the ears was a great idea and inspired this mini collection.
The bunny ear hat, with added bow.

The Sarah-Jane bow shoes.
The bow cardigan.
Ava wearing her ribbon flower hairband.
I was so pleased that her hairband looked so good... I shall definitely make her some more.
The knitted onsie, already for Christmas.
The onsie showing my tassled hood. ( http://garnstudio.com/lang/dk/includes/pattern-print.php?id=4920) 
I've also made my first crocheted beret; it's for mum, to go with her mitts.
The crocheted beret.
Showing the back of the beret.
So, that's me all up to date for a while.... more news later people's :)

Monday 7 September 2015

Covering a cake board... a tutorial.

I've taken to standing my book art projects on a covered cake board, for presentation purposes. It really finishes the project off. This tutorial will take you step by step through the process of covering a board.
So, here we go.
You will need a thin cake board, large enough for your book fold to stand on.
Your chosen wallpaper, to match or compliment your book fold's colour scheme; it needs to be large enough to easily cut 2 circles the size of your board with an overlap.
PVA glue and brush.
Double sided tape.

Lay your cake board on to your wallpaper and draw around the board. This first circle will be the visible paper on top of the board. If you wish a particular bit of the pattern to be shown, position your board first in the right place.


Draw the circle on the wrong side of the paper and put the board to one side. Draw another circle outside the first line, about 2 inches/5cm larger.
Cut out the bigger circle.
Now cut in to the inner line, making a small fringe all the way round. My fringe segments are about 1/2"/ 12-15mm wide.


Before we go on to the next step you need to draw a second circle on another piece of wall paper. Now draw a line about 3-5mm inside this circle and cut out using the inner line. This circle will cover the back of your board. Put this to one side while you cover the front of the board.


...so the next step is to fix the paper to the board. 
Cut a piece of double sided tape and position it in the centre of the board, or in the centre of your paper circle. 
Stick the board to the wrong side of the paper.


Now get your glue and brush out. 
Glue the strips to the board, one at a time, overlapping where necessary and keeping the edge as neat as possible.


When you've glued all of the strips, glue either the smaller paper circle or the board itself; position the circle centrally on the back of the board, covering up the edges of the overlapping strips.


...and there you are... a covered cake board to compliment your finished project. 

Any questions or comments please feel free to use the comment box below... happy sticking!

Thursday 13 August 2015

Update & up to date...

Afternoon peoples... it's been a while since my last post... the dreaded #Fibro and #ME reared their ugly heads again and decided to hang around for quite a while.
However, in between the bad days I have managed to get a bit of crafting done; I've made some hair decorations for 3 of my granddaughters and also finished of some bookart projects.
So... firstly here are some of the hair bits, these first 3 are matching, as the girls are all sisters. 

These are all the same colour pink but they photographed differently.
Three bows for three sisters.
These next ones are for school, for the eldest.


...and these are a selection, so that their mum can make a choice. 
Shabby chic, on a pink Alice band.
Double stacked twisted boutique bow on a clip.
Blues, white and daisies on a stretchy band.
Aqua and white on a clip.
Spotty lilac and satin on a clip.
The Book Art projects. 
This book fold was actually for a competition. The pattern was for a horse & we could decorate it as we wanted. 
Unfortunately this was last month, just as my Fibro and ME took off with a vengeance, so the closing date came & went with my entry half finished. 
To be honest this was the least of my worries at the time, this recent bout really knocked me for six; when I realised that I'd missed the deadline, I made sure that I finished it when I was able... it won't go to waste (it will make a great present). 
A Magical Forest; The Unicorn.
The stylised trees.
I really liked the way the cover turned out; the stylised trees echo the inside cover and stand out well against the background of decoupaged doilies. I finished the trees of with a touch of gold on top of the white, with added sequins and gold skeleton leaves.
The second book fold was for my friend, she wanted a BookArt present for a new baby ...whose name is Bluebell. I used images of old bluebell flower fairies for the cover and I was very pleased with the result.
The 'Bluebell' book was finished off with bluebell coloured ribbons, glitter, white crocheted flowers, butterflies and handmade paper flowers.
Bluebell, finished with crocheted flowers, glitter and ribbons.
A bluebell fairy, and the handmade paper flowers.
Well folks, that's all for the moment; I hope you like what I've been doing while I've been laid up, hopefully the next ME & Fibro flare won't be quite so bad as this last one.
I shall be back before you know it. Stay safe & take care of each other.